Just as a river flows from its source through various bends before reaching the sea, a typical HTTP request travels from a client across multiple network hops until it reaches its destination server.
During this journey, the request’s original IP address is lost as it moves through multiple network infrastructures such as proxy servers and load balancers. This happens because some of these hops terminate the TCP connection and create a new TCP connection with the next hop. As a result, the receiving server only sees the IP address of its directly connected hop in the chain rather than the client’s original IP address.
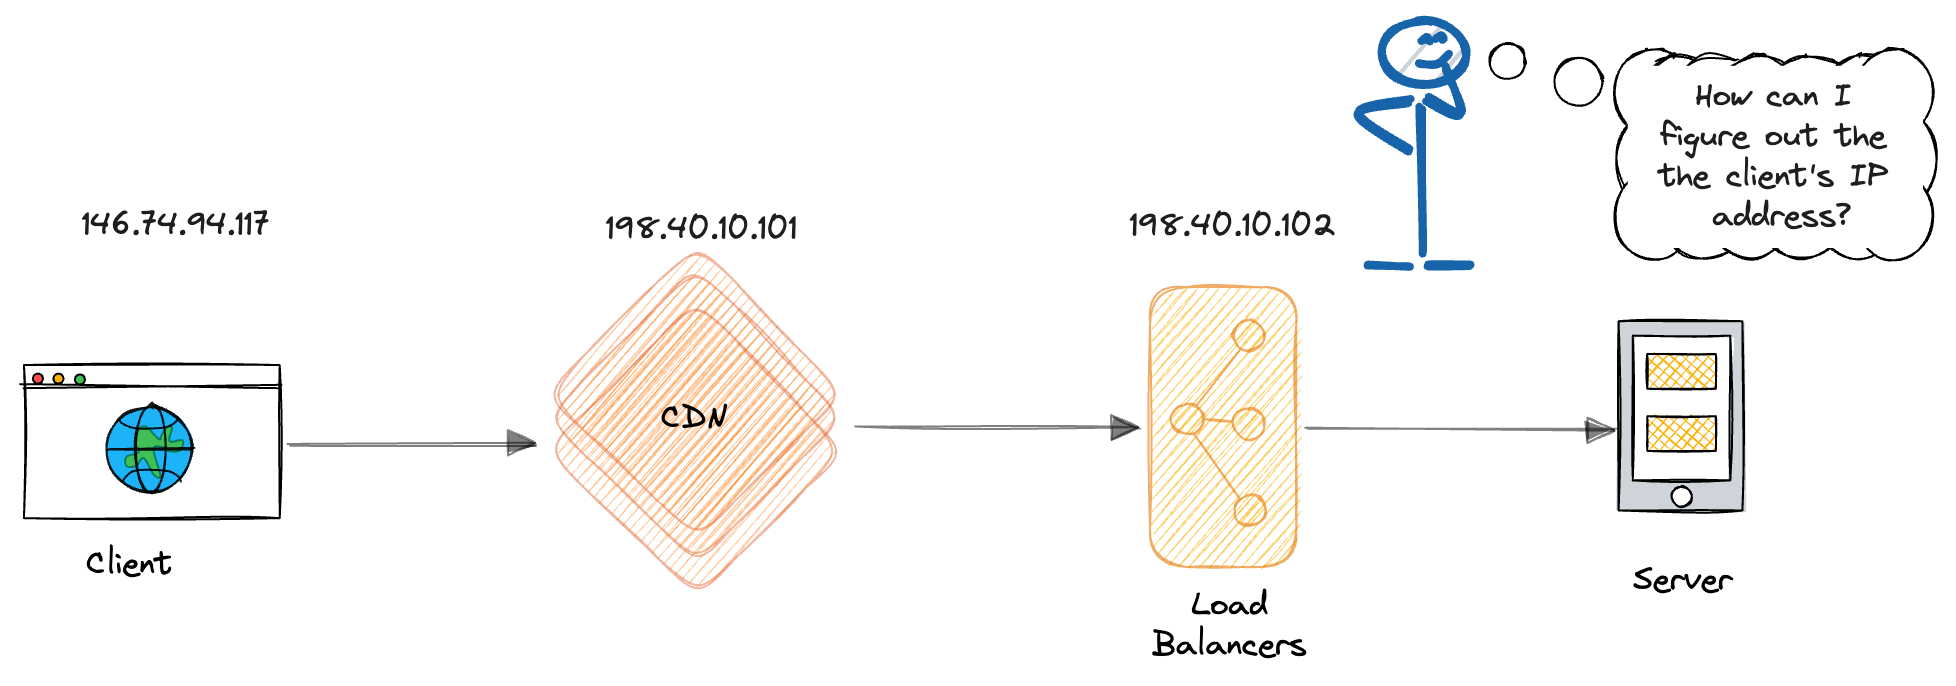
The above diagram is a simplified representation of an HTTP request’s journey from the client to the server. Some details, such as a server may have multiple IP addresses, or the IP address may be changed by network address translation (NAT), are omitted in this diagram and the other examples in this article, so that we can focus on the main concepts.
However, when processing the request, the backend often needs to know the client’s “Real” IP address for various reasons, below are some of them:
- Fraud Prevention: The client IP address can help identify malicious actors and enable blocking of specific IP addresses associated with abusive behavior, hacking attempts, or denial-of-service attacks.
- Access Control: Some systems restrict access to certain resources based on IP addresses. Knowing the client IP address allows you to implement whitelisting policies.
- User Experience: Geolocation data derived from client IP addresses can be used to tailor content to users based on their location, such as displaying localized content or language.
- Application Performance: Client IP addresses are used to implement rate limiting to prevent abuse and ensure fair usage of resources. It can also be used to distribute traffic effectively and maintain session affinity.
Envoy provides several methods to obtain the client’s IP address, including using the X-Forwarded-For HTTP header, custom HTTP headers, and the proxy protocol.
This article will explore these methods, detailing how to configure each one in Envoy. Additionally, we’ll demonstrate how to simplify configuration using Envoy Gateway, and discuss leveraging the client’s IP for traffic management, such as access control and rate limiting.
X-Forwarded-For HTTP Header
What is X-Forwarded-For?
The X-Forwarded-For (XFF) header is a de facto standard HTTP header. It’s used to identify the originating IP address of a client connecting to a backend server through multiple proxies or load balancers.
When an HTTP request passes through a proxy or load balancer, that hop can add or update the X-Forwarded-For header with the client’s IP address. This ensures that the original client’s IP address is preserved.
This header can either include a single IP address (representing the original client) or a series of IP addresses that trace the path of the request through various proxies. Typically, it is formatted as a comma-separated list of IP addresses, like this:
X-Forwarded-For: client, proxy1, proxy2, …
Imagine an HTTP request from a client that travels through two proxies, a CDN server like AWS CloudFront, and a load balancer such as AWS ALB before reaching the server. The request path would look like this:
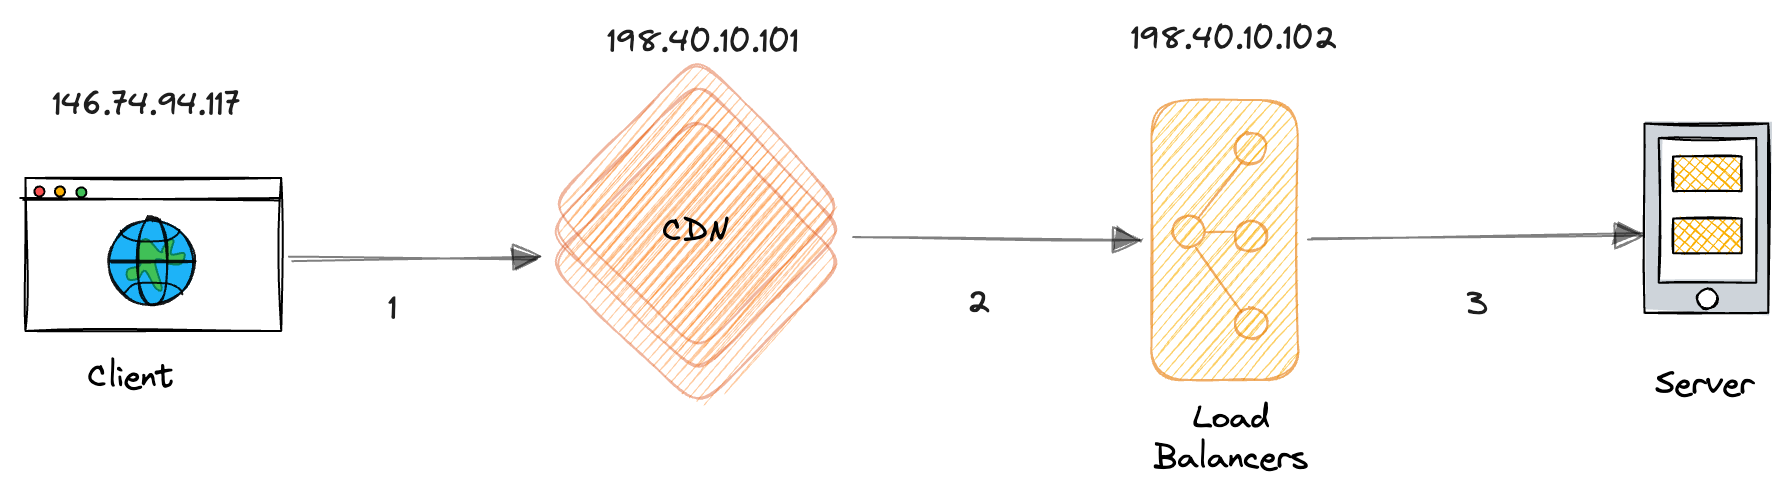
During this process, the HTTP request is relayed through two proxies, each of which originates a new TCP connection. As the request passes through each proxy, the proxy appends the source IP address of the relayed TCP connection to the X-Forwarded-For header.
Below are the source and destination addresses for each TCP connection, along with the content of the corresponding HTTP X-Forwarded-For headers:
| TCP Connection | Source IP | Destination IP | XFF Header | |
|---|---|---|---|---|
| 1 | From Client to CDN | 146.74.94.117 | 198.40.10.101 | |
| 2 | From CDN to Load Balancer | 198.40.10.101 | 198.40.10.102 | 146.74.94.117 |
| 3 | From Load Balancer to Server | 198.40.10.102 | Server IP | 146.74.94.117,198.40.10.101 |
As the above table shows, even though the source IP address changes as the request passes through each TCP connection ,the client’s IP address is preserved in the X-Forwarded-For header. The server can then extract the client’s IP address from the X-Forwarded-For header. Knowing that there are 2 hops, it selects the second value from the rightmost value.
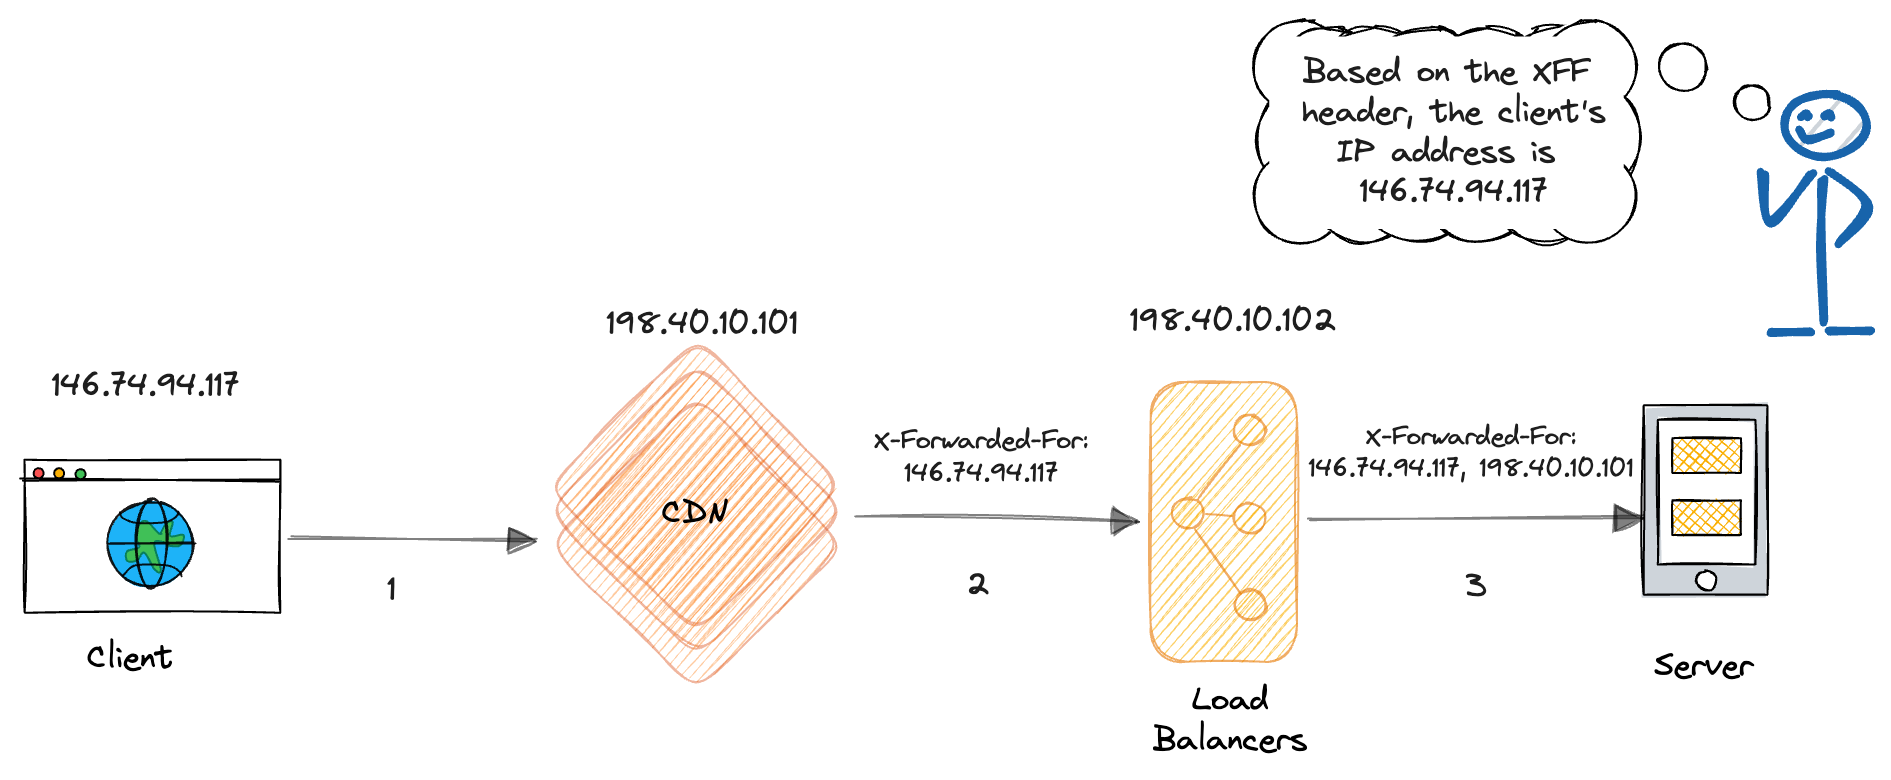
The X-Forwarded-For header is a widely accepted de facto standard, making it simple to implement and read, as most proxy servers and load balancers support it.
However, there’s also a security concern to keep in mind: the X-Forwarded-For header could be easily faked. Any hop the request passes through could modify this header. So, when relying on X-Forwarded-For, make sure you trust the hops where it’s coming from.
How to Configure X-Forwarded-For in Envoy
Here’s how you can configure the X-Forwarded-For header in Envoy to get the client’s IP address.
Envoy offers two ways to extract the client’s IP address from the X-Forwarded-For header: through the HTTP Connection Manager (HCM) and the IP Detection Extension. Let’s go over the configuration steps for both methods.
Configuring X-Forwarded-For in HCM
To configure Envoy’s HTTP Connection Manager (HCM) to extract the client’s IP from the X-Forwarded-For header, you need to set xffNumTrustedHops. This parameter defines the number of IP addresses in the X-Forwarded-For header that Envoy should trust. Adjust xffNumTrustedHops according to your network topology for proper configuration.
For instance, consider a request path like this: client -> proxy1 -> proxy2 -> Envoy. If proxy1 and proxy2 are in a trusted network and both modify the X-Forwarded-For header, the header of an HTTP request received by Envoy may look like this:
X-Forwarded-For: client, proxy1
In this case, we need to set xffNumTrustedHops to 2, telling Envoy to extract the second rightmost IP address in the X-Forwarded-For header and use it as the client’s IP address for the request.
Here’s an example of the Envoy configuration for this setting:
"name": "envoy.filters.network.http_connection_manager",
"typedConfig": {
  "@type": "type.googleapis.com/envoy.extensions.filters.network.http_connection_manager.v3.HttpConnectionManager",
  // omitted for brevity
  // ...

  "xffNumTrustedHops": 2
}
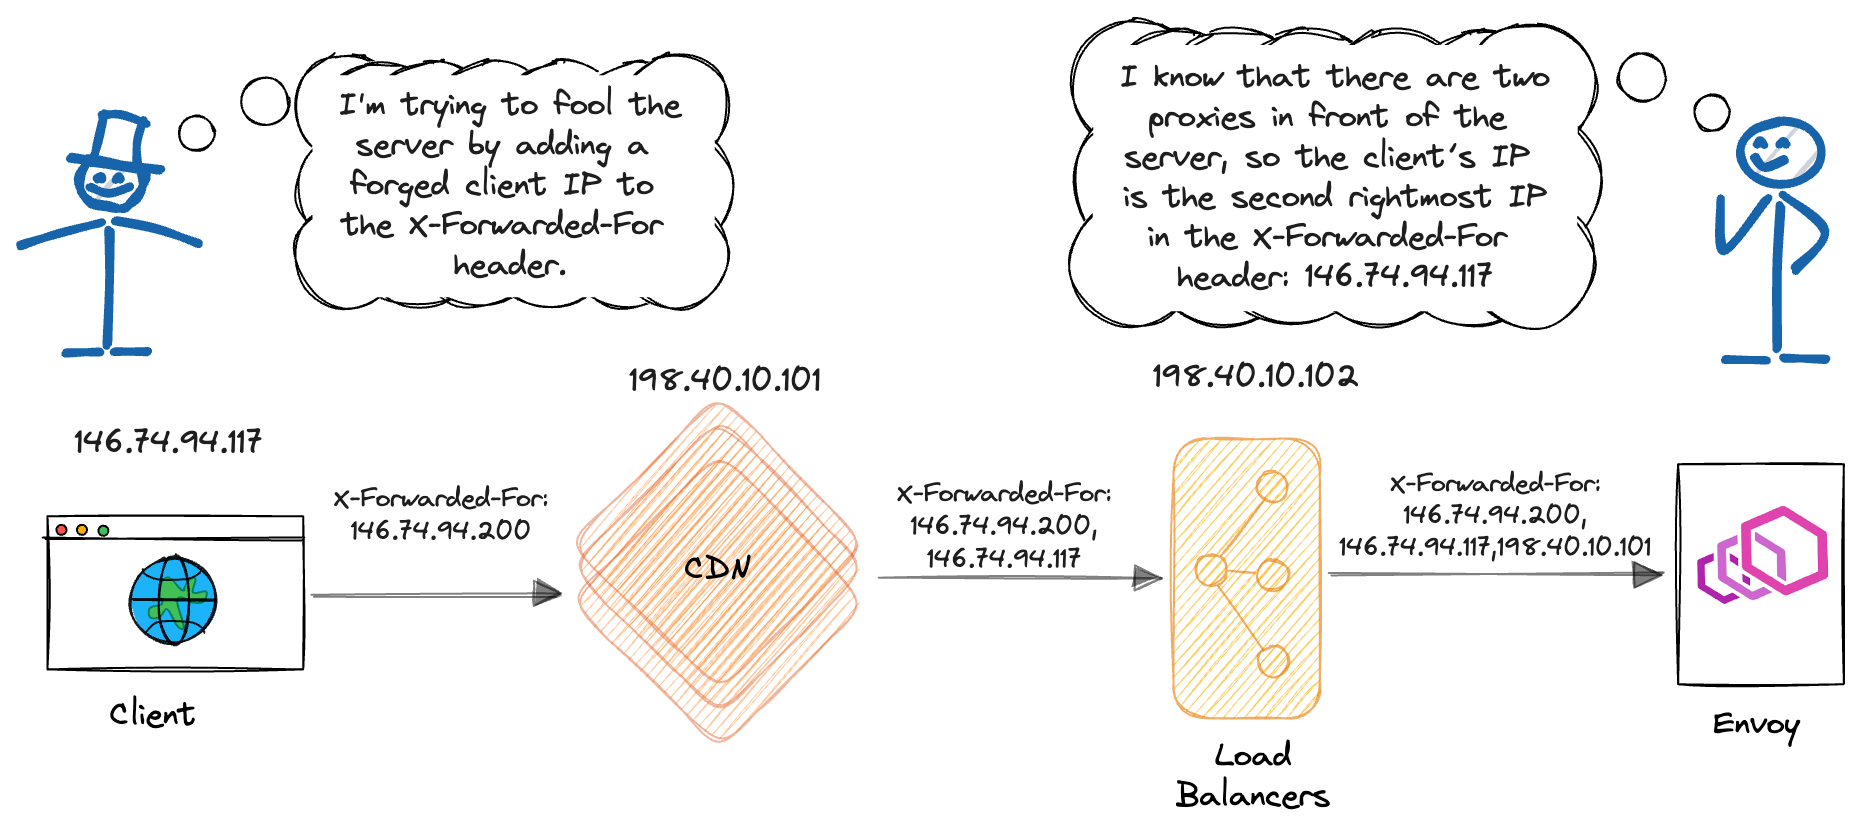
As long as the number of hops set in xffNumTrustedHops is correct and these hops can be trusted, we can ensure that malicious users cannot forge the client IP address.
Imagine an attacker trying to pose as a legitimate client by forging the X-Forwarded-For header. In the request, he includes a fake X-Forwarded-For header like this:
X-Forwarded-For: forged-client
The request then goes through proxy1 and proxy2, each appending the client’s IP address and proxy1’s IP address to the X-Forwarded-For header. As a result, the X-Forwarded-For header in the request that Envoy receives appears as follows:
X-Forwarded-For: forged-client, client, proxy1
Because we set xffNumTrustedHops to 2, Envoy will look at the second rightmost IP address in the X-Forwarded-For header. This allows Envoyto obtain the client’s actual IP address while ignoring the fake one. Proper configuration helps protect Envoy and the backend services from attacks by malicious users.
Using the XFF Original IP Detection Extension
Apart from setting up X-Forwarded-For in HCM, you can also extract the client’s IP address using the Original IP Detection Extension. The setup is similar to HCM, but instead of configuring it directly within HCM, you use the XFF Original IP Detection Extension.
Here’s an example of how to configure X-Forwarded-For with the XFF Original IP Detection Extension:
"name": "envoy.filters.network.http_connection_manager",
"typedConfig": {
  "@type": "type.googleapis.com/envoy.extensions.filters.network.http_connection_manager.v3.HttpConnectionManager",
  // omitted for brevity
  // ...

  "originalIpDetectionExtensions": [
    {
      "name": "envoy.extensions.http.original_ip_detection.xff",
      "typedConfig": {
        "@type": "type.googleapis.com/envoy.extensions.http.original_ip_detection.xff.v3.XffConfig",
        "xffNumTrustedHops": 1
      }
    }
  ]
}
Note: There’s likely a bug in the IP Detection Extension. The xffNumTrustedHops parameter needs to be set to one less than the actual number of IP addresses. For example, if you need to extract the second-to-last IP address, set xffNumTrustedHops to 1.
Custom HTTP Headers
In some cases, you may want to use a custom HTTP header to pass the client’s IP address. This approach can be useful when the standard X-Forwarded-For header is not available in a legacy system, or when you want to use a different header for security reasons, or when you want to pass additional information along with the client’s IP address.
How to Configure Custom Headers in Envoy
To configure a custom header in Envoy, you need to set up the Custom Header IP Detection Extension. This extension allows you to specify a custom header to extract the client’s IP address. For example, if we use a X-Real-IP header to store the client’s IP address, here’s how you can configure it:
"name": "envoy.filters.network.http_connection_manager",
"typedConfig": {
  "@type": "type.googleapis.com/envoy.extensions.filters.network.http_connection_manager.v3.HttpConnectionManager",
  // omitted for brevity
  // ...

  "originalIpDetectionExtensions": [
    {
      "name": "envoy.extensions.http.original_ip_detection.custom_header",
      "typedConfig": {
        "@type": "type.googleapis.com/envoy.extensions.http.original_ip_detection.custom_header.v3.CustomHeaderConfig",
        "allowExtensionToSetAddressAsTrusted": true,
        "headerName": "X-Real-IP"
      }
    }
  ]
}
Proxy Protocol
Passing the client’s IP address via HTTP headers works well, but it has a limitation—it only works with HTTP. If your service also needs to support other protocols, consider using the Proxy Protocol.
What is the Proxy Protocol?
Proxy Protocol operates at the transport layer (TCP) to convey the client’s IP address between a proxy and a backend server.
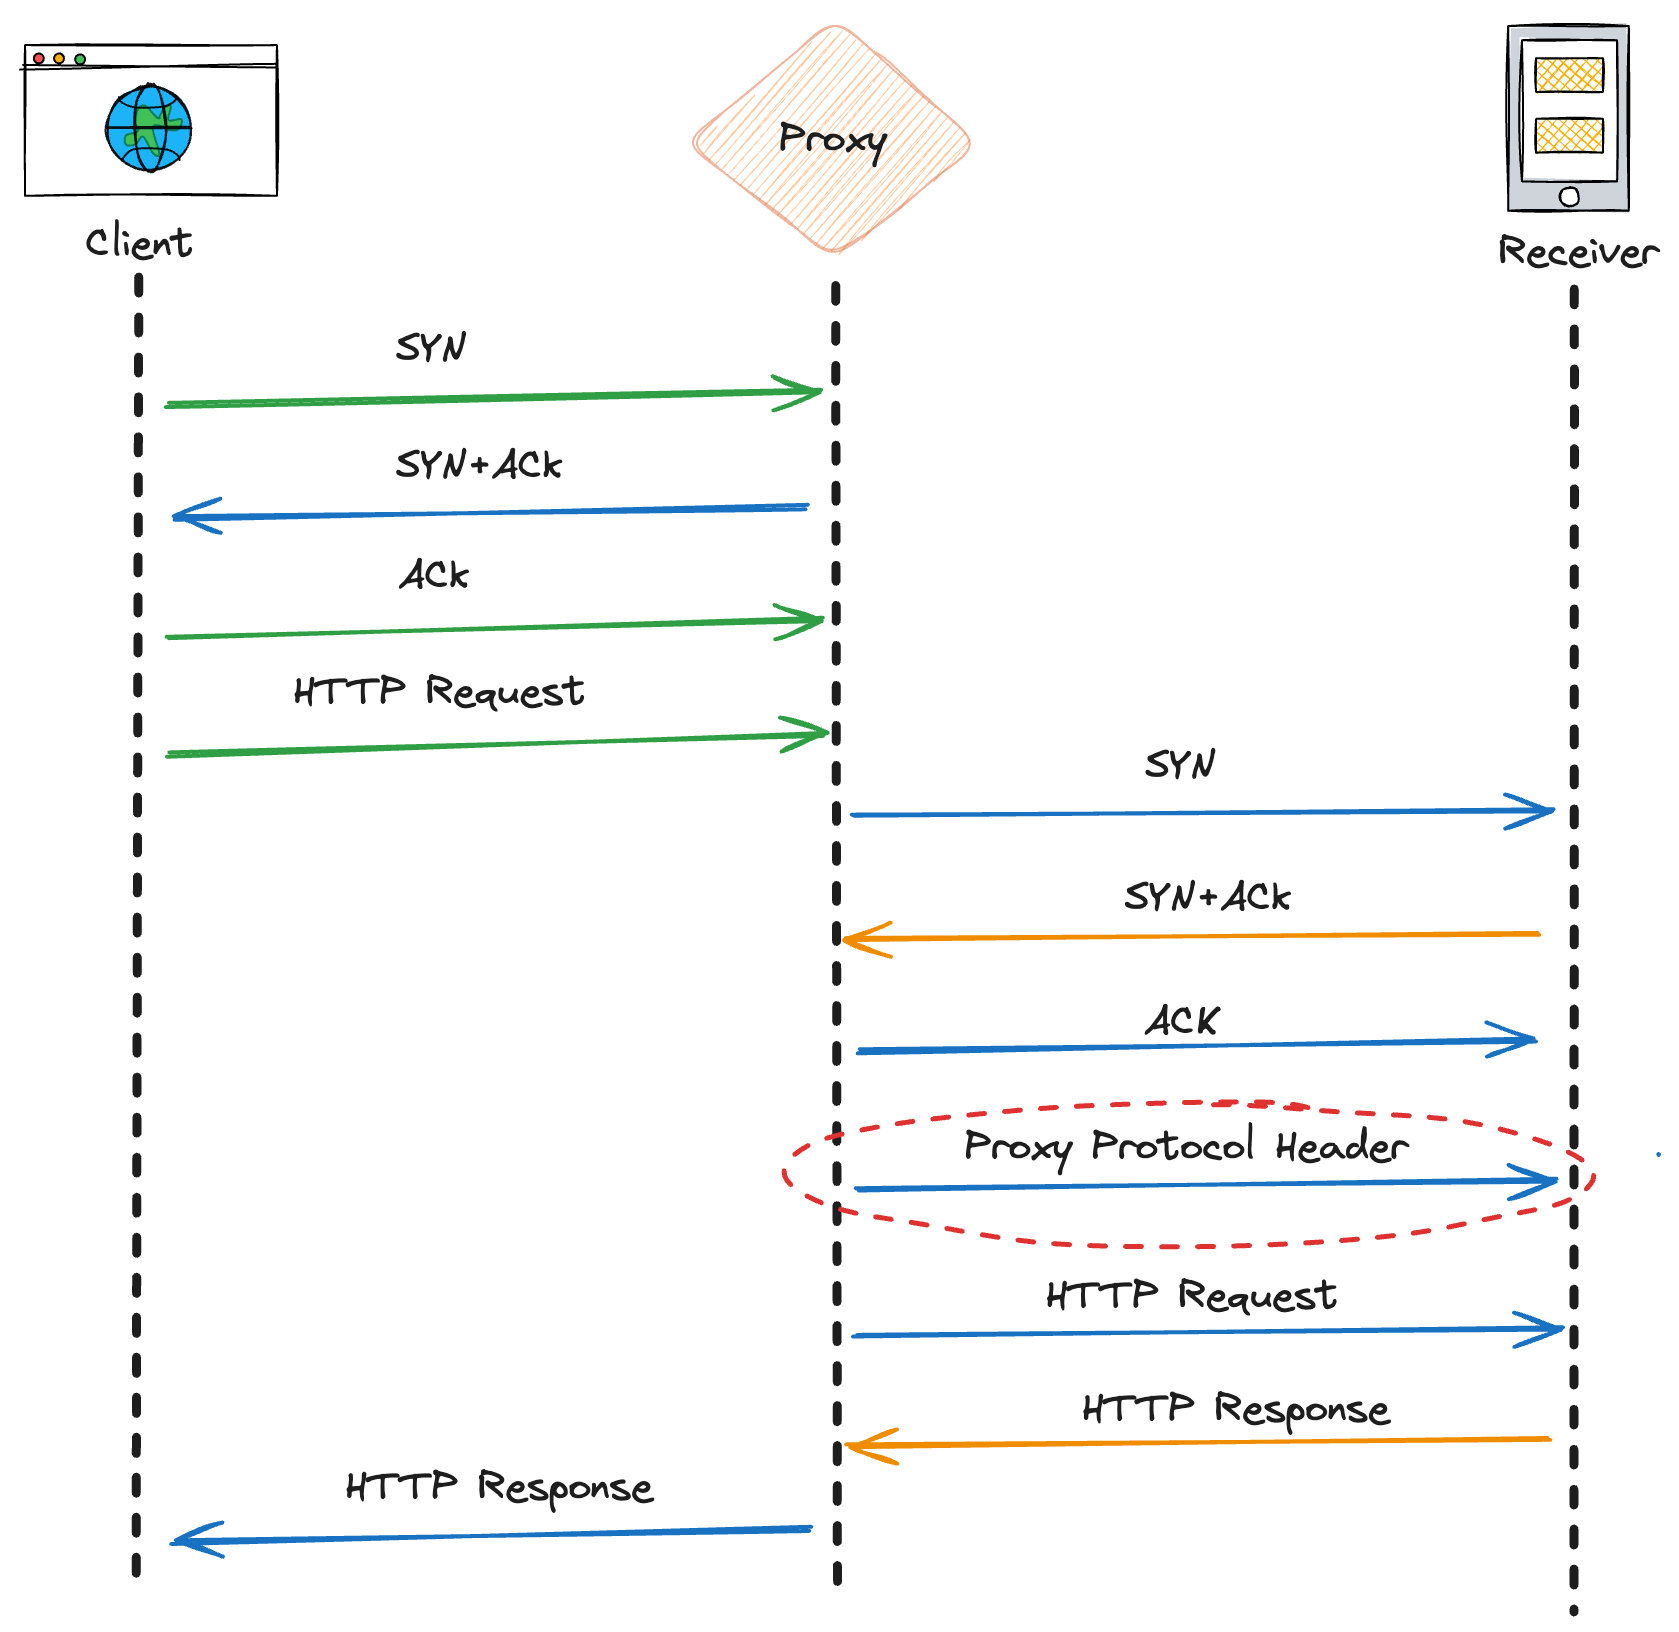
The Proxy Protocol works by adding a header that contains the client’s IP address at the beginning of a TCP connection. This header is inserted immediately after the TCP handshake and before any application data is transmitted. As a result, it’s transparent to the application protocol and can be used with any application protocol, including HTTP, HTTPS, SMTP, and more.
Proxy Protocol has two versions: version 1 and version 2. Version 1 uses a text format that’s human-readable, while version 2 uses a binary format that’s more efficient but less readable. When using Proxy Protocol, we need to ensure that the sending and receiving servers are configured with the same version.
Although the formats are different, both versions work in a similar way. Let’s look at version 1 to understand how the Proxy Protocol works, as its format is easier to read.
The Proxy Protocol Version 1 header is a single line of text that starts with the string “PROXY” followed by several fields separated by spaces. Here is the format:
PROXY <INET_PROTOCOL> <CLIENT_IP> <SERVER_IP> <CLIENT_PORT> <SERVER_PORT>\r\n
After the TCP connection handshake is complete, the sender sends a Proxy Protocol Header to the receiver. This header contains a few fields, what we are interested in is the client’s IP address. Then the proxy server forwards the client’s data right after the Proxy Protocol Header.
Here is an example of an HTTP request with a Proxy Protocol Header:
PROXY TCP4 162.231.246.188 192.168.0.11 56324 443\r\n
GET / HTTP/1.1\r\n
Host: www.example.com\r\n
\r\n
In the above example:
- PROXY indicates that this is a Proxy Protocol header.
- TCP4 indicates it’s using IPv4 and TCP protocols.
- 162.231.246.188 is the original client’s IP address.
- 192.168.0.11 is the IP address of the proxy (the sender).
- 56324 is the client’s port number.
- 443 is the proxy’s port number.
When the receiver receives a new TCP connection with a Proxy Protocol Header, it first parses this header to extract the client’s IP address and other information. Then it strips the Proxy Protocol Header from the TCP data, ensuring that the actual HTTP request can be processed normally. If the receiver is also an intermediate hop supporting the Proxy Protocol, it can forward the client’s IP address to the next hop in the network, thus preserving the client’s identity throughout the request’s journey.
How to Configure Proxy Protocol in Envoy
Here’s how to configure the Proxy Protocol in Envoy. The Proxy Protocol header is inserted during the TCP handshake, so we need to enable it in the Listener settings.
We need to add an envoy.filters.listener.proxy_protocol Listener Filter in the Listener configuration. This filter will extract the client’s IP address by parsing the Proxy Protocol Header from the first data packet of the TCP connection. After that, it strips the Proxy Protocol Header and forwards the actual application data to the HTTP Connection Manager (HCM) for further processing.
"listener": {
  "@type": "type.googleapis.com/envoy.config.listener.v3.Listener",
  "address": {
    "socketAddress": {
      "address": "0.0.0.0",
      "portValue": 10080
    }
  },
  // omitted for brevity
  // ...

  "listenerFilters": [
    {
      "name": "envoy.filters.listener.proxy_protocol",
      "typedConfig": {
        "@type": "type.googleapis.com/envoy.extensions.filters.listener.proxy_protocol.v3.ProxyProtocol"
      }
    }
  ],
}
Too Complex? Envoy Gateway to the Rescue!
By using the above methods, we can obtain the client’s IP address in Envoy. These methods often require manual configuration within Envoy’s extensive configuration files, which can span thousands of lines.
As a data-plane infrastructure, Envoy’s configuration syntax is primarily designed for control plane usage, aiming to provide flexibility and customizability rather than a human-friendly UI. This syntax includes numerous detailed configuration options, often requiring a deep understanding of Envoy’s internal implementation details to configure correctly. As a result, it can be challenging for the average user to work directly with Envoy’s configuration files.
One of the main goals of Envoy Gateway is to simplify the deployment and configuration of Envoy. Envoy Gateway uses Kubernetes Custom Resource Definitions (CRDs) to offer a higher level of abstraction over Envoy, hiding unnecessary details and making it easier for users to configure Envoy.
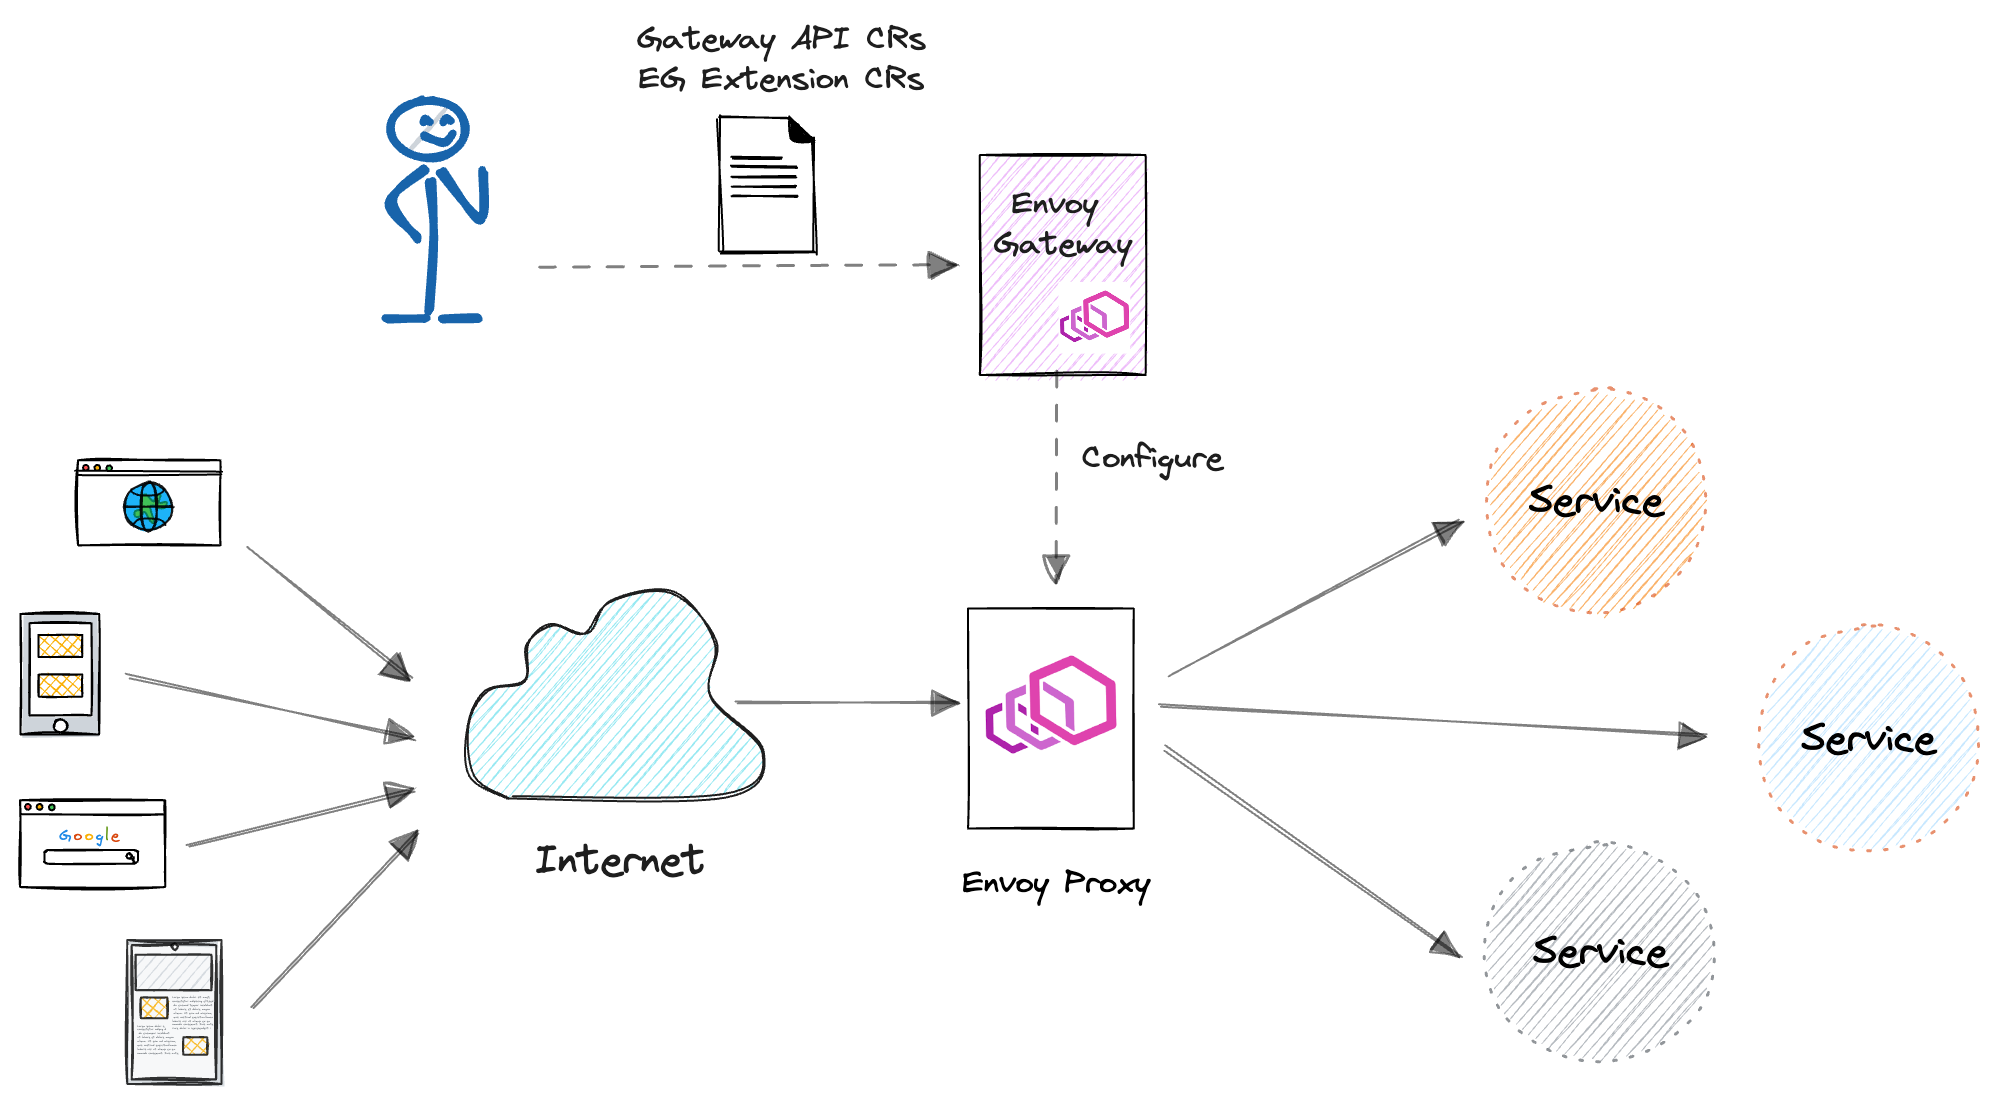
ClientTrafficPolicy is a custom Gateway API Policy CRD defined by Envoy Gateway, designed to configure network traffic policies for clients connecting to the Envoy Proxy. Users can create a ClientTrafficPolicy to configure Envoy and obtain the client’s IP address.
In ClientTrafficPolicy, we can configure clientIPDetection to extract the client’s IP address from the X-Forwarded-For header or a custom header.
Here is an example of a ClientTrafficPolicy configuration that extracts the client’s IP address from the X-Forwarded-For header. This configuration takes the second rightmost IP address from the X-Forwarded-For header as the client’s IP address:
apiVersion: gateway.envoyproxy.io/v1alpha1
kind: ClientTrafficPolicy
metadata:
  name: enable-client-ip-detection-xff
spec:
  clientIPDetection:
    xForwardedFor:
      numTrustedHops: 2
  targetRef:
    group: gateway.networking.k8s.io
    kind: Gateway
    name: my-gateway
If the client’s IP address is passed using a custom header, it can be extracted using the customHeader field. Here’s an example of a ClientTrafficPolicy configuration that retrieves the client’s IP address from the X-Real-IP custom header.
apiVersion: gateway.envoyproxy.io/v1alpha1
kind: ClientTrafficPolicy
metadata:
  name: enable-client-ip-detection-custom-header
spec:
  clientIPDetection:
    customHeader:
      name: X-Real-IP
  targetRef:
    group: gateway.networking.k8s.io
    kind: Gateway
    name: my-gateway
If the network middlewares on the request path support the proxy protocol, you can also enable it using the enableProxyProtocol field in ClientTrafficPolicy. Here’s an example of how to set up ClientTrafficPolicy to make Envoy pull the client’s IP address from the proxy protocol:
apiVersion: gateway.envoyproxy.io/v1alpha1
kind: ClientTrafficPolicy
metadata:
  name: enable-proxy-protocol
spec:
  enableProxyProtocol: true
  targetRef:
    group: gateway.networking.k8s.io
    kind: Gateway
    name: my-gateway
Leveraging Client IP Address for Traffic Management
With the help of Envoy Gateway, users can easily obtain the client’s IP address without digging into Envoy’s enormous configuration details. Once the client’s IP address is obtained, you can take it a step further—use it with Envoy Gateway’s enhanced traffic management features like access control and rate limiting.
With Envoy Gateway’s SecurityPolicy, you can control access to your services based on the client’s IP address.
Below is an example configuration that only allows client IP addresses from the admin-region-us-east and admin-region-us-west regions to access the admin-route HTTPRoute. All other requests will be denied.
apiVersion: gateway.envoyproxy.io/v1alpha1
kind: SecurityPolicy
metadata:
  name: authorization-client-ip
  namespace: gateway-conformance-infra
spec:
  targetRef:
    group: gateway.networking.k8s.io
    kind: HTTPRoute
    name: admin-route
  authorization:
    defaultAction: Deny
    rules:
    - name: admin-region-us-east
      action: Allow
      principal:
        clientCIDRs:
        - 10.0.1.0/24
        - 10.0.2.0/24
    - name: admin-region-us-west
      action: Allow
      principal:
        clientCIDRs:
        - 10.0.11.0/24
        - 10.0.12.0/24
With Envoy Gateway’s BackendTrafficPolicy, you can implement rate limiting for client IP addresses. In the example configuration below, client IPs from the 192.168.0.0/16 range are restricted to 20 requests per second per IP. Any requests beyond this limit will be rejected.
apiVersion: gateway.envoyproxy.io/v1alpha1
kind: BackendTrafficPolicy
metadata:
  name: policy-httproute
spec:
  targetRef:
    group: gateway.networking.k8s.io
    kind: HTTPRoute
    name: myapp-route
    namespace: default
  rateLimit:
    type: Global
    global:
      rules:
      - clientSelectors:
        - sourceCIDR:
          type: "Distinct"
          value: 192.168.0.0/16
        limit:
          requests: 20
          unit: Second
Key Takeaways
Before reaching the final destination server, a client’s request typically traverses multiple network hops, such as proxy servers and load balancers, and the original client IP is lost along the way.
Envoy provides several methods to obtain the client’s real IP address, including using the standard X-Forwarded-For header, custom HTTP headers, and the Proxy Protocol. Each method has its advantages and disadvantages, and Envoy supports all of them, allowing users to select the most appropriate solution based on their specific use cases.
While Envoy’s configuration syntax can be complex and challenging for average users, managing Envoy with Envoy Gateway significantly simplifies the process of retrieving the client IP from the request. Additionally, Envoy Gateway enables advanced use cases such as access control, rate limiting, and other client IP-based traffic management.
👇👇👇Do you utilize client IP in your Gateway configuration? I love to hear about your use cases! Feel free to leave a comment below and share your insights.👇👇👇